![]() Touch
the Tools button on the main
button bar.
Touch
the Tools button on the main
button bar.
![]() Select
System Configuration from
the drop-down menu.
Select
System Configuration from
the drop-down menu.
![]() Touch
the OPC Spray Monitor button
at the top of the System Configuration
window:
Touch
the OPC Spray Monitor button
at the top of the System Configuration
window:
NOTE: Access to this function is normally restricted to Nordson field service personnel or trained administrators.
If setting up a new system or adding new Spray Monitors to an existing system, you must add the Spray Monitors to the OI. The OI then creates a faceplate for the Spray Monitor.
![]() Touch
the Tools button on the main
button bar.
Touch
the Tools button on the main
button bar.
![]() Select
System Configuration from
the drop-down menu.
Select
System Configuration from
the drop-down menu.
![]() Touch
the OPC Spray Monitor button
at the top of the System Configuration
window:
Touch
the OPC Spray Monitor button
at the top of the System Configuration
window:
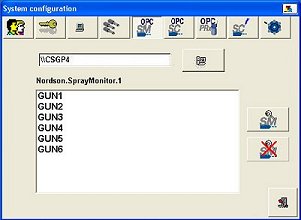
![]() OPC Remote Client option:
If you are setting up a Remote Client then the Remote button appears on
this window. Touch the Remote button and enter the network name of the
computer the OPC Server is installed on. This allows the Remote Client
to communicate with the OPC server.
OPC Remote Client option:
If you are setting up a Remote Client then the Remote button appears on
this window. Touch the Remote button and enter the network name of the
computer the OPC Server is installed on. This allows the Remote Client
to communicate with the OPC server.
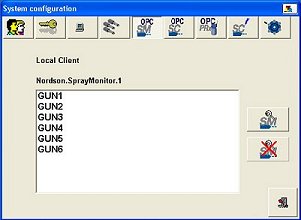
OPC Local Client: If the words Local Client appear instead on the System Configuration window, then the OI and OPC Server are installed on the same PC and you can start adding spray monitors.
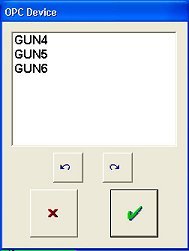
![]() Touch the Add Spray Monitors
button. The OPC Device
window appears, listing the Spray Monitors available on the network.
Touch the Add Spray Monitors
button. The OPC Device
window appears, listing the Spray Monitors available on the network.
NOTE: The OPC Server always recognizes the Spray Monitors by their default names (GUN1, GUN2, etc.) as defined by their node address switch settings.
Touch the names of the Spray Monitors you want to add, or
![]() Select
all Monitors.
Select
all Monitors.
![]() Deselect
all selected Monitors.
Deselect
all selected Monitors.
![]() Accept
the selections, or
Accept
the selections, or
![]() cancel.
cancel.
The new Spray Monitors appear in the list on the System Configuration window, and the new Spray Monitor faceplates appear in the main window. If there are PRx Modules on the iTrax CAN network with the same node address settings as the Spray Monitors, their faceplates also appear.
Add Spray Controllers and standalone PRx Modules to the OI.
Make Service Settings for each Spray Monitor.
Configure the Spray Monitors before beginning production.
Create Spray Machines if you use One-Button Recipes.