![]() Touch the Tools button on the main button bar.
Touch the Tools button on the main button bar.
![]() Select System Configuration from the drop-down menu.
Select System Configuration from the drop-down menu.
![]() Touch the Group button at the top of the System Configuration window.
Touch the Group button at the top of the System Configuration window.
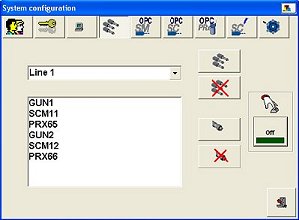
The top field is the Group List. It drops down to show existing groups and the default All group.
The bottom field is the Module List, showing the modules in the currently selected group.
NOTE: Grouping is an OPC server function. The OPC Server always lists the modules by their default names (GUN1, SCM11, PRX65, etc.).
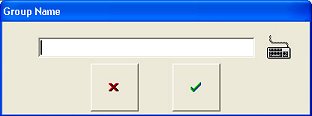
![]() Touch the Add Group button. The Group Name dialog box appears.
Touch the Add Group button. The Group Name dialog box appears.
Enter a unique group name. The group name can have a maximum of 15 characters.
![]() Touch the Keyboard button to use the Windows on-screen keyboard. Close the keyboard by touching the X button at the upper right corner of the keyboard.
Touch the Keyboard button to use the Windows on-screen keyboard. Close the keyboard by touching the X button at the upper right corner of the keyboard.
![]() Touch the OK button to accept the group name and return to the System Configuration window. The new group name will appear in the Group List field.
Touch the OK button to accept the group name and return to the System Configuration window. The new group name will appear in the Group List field.
Adding Modules or Spray Machines to a Group
![]()

Use this button to turn Manual Add on or off. When it is on, you can choose to add individual modules to a group. When it is off, you can only add Spray Machines that you have already created to a group.
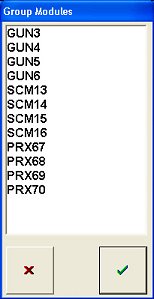
![]() Touch the Add Modules button. A dialog box listing the modules or spray machines not already in a group appears.
Touch the Add Modules button. A dialog box listing the modules or spray machines not already in a group appears.
Select the modules or spray machines that you want to add to the group.
![]() Touch the OK button to accept your selections. The selected modules, or the modules in the selected spray machines, now appear in the Modules List.
Touch the OK button to accept your selections. The selected modules, or the modules in the selected spray machines, now appear in the Modules List.
![]() Touch the Exit button to close the System Configuration window.
Touch the Exit button to close the System Configuration window.